3 Quick Site Speed and Performance Improvements for WordPress
If you’re hosting your WordPress site on GoDaddy, specifically with cPanel, here are 3 quick optimizations you can make to improve your site speed and server performance.
Site speed and server performance have the ability to affect so much these days. From user experience to SEO to paid ads to a site’s conversion rate, a slow site can wreak havoc on all of your channels. We hope these tips help.
1. Install the W3 Total Cache plugin.
If you haven’t done this already, you absolutely should because it is the best caching plugin out there for WordPress and there is really no good reason to not utilize it.
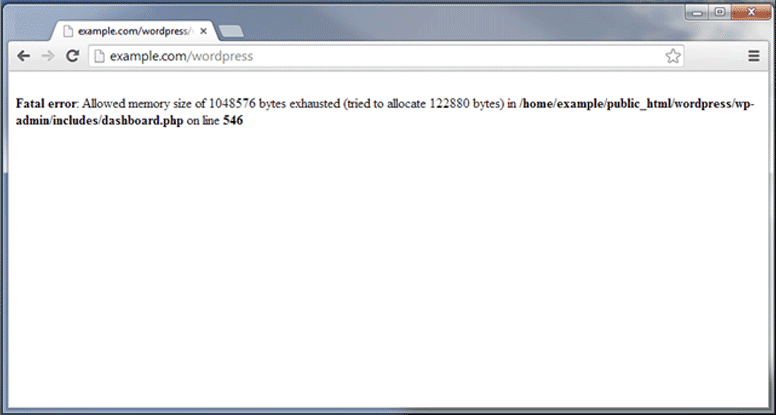
2. Update the PHP memory limit and APC size of your hosting environment.
As of February 2015, GoDaddy defines a 64M (MB) memory limit for PHP and a 32M (MB) APC shm_size (shared memory size). APC stands for Alternative PHP Cache and is an awesome way to improve your environment’s PHP performance. It is used to cache and optimize segments of your PHP code, reducing the tax your application has on the server and freeing it up to handle requests at a much faster rate.
Download Young Fitness Woman Runner for free trenbolone buy Which Fitness Tracker Fits Your Personality?
To perform this in your GoDaddy cPanel account, login and go to your File Manager. In your website’s root directory, create a new file with whatever name you want. I use phpinfo.php. Put this in the file:
<?php phpinfo(); ?>
Save the file and go to it in your browser. ie. http://www.mydomamin.com/phpinfo.php

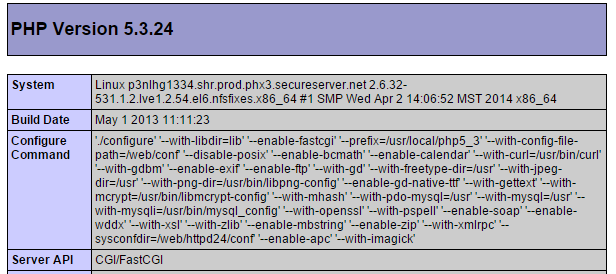
This will give you all the PHP information installed and setup in your environment. There is a lot of information here so don’t be alarmed. We will focus on a few specific areas.

![]() First, let’s look at the PHP Core settings. Find the section that reads ‘Core’. Then under that table, find what is defined as the ‘memory_limit’. It probably reads 64M for 64 Megabytes. We will come back to this page later to verify our updates have taken place.
First, let’s look at the PHP Core settings. Find the section that reads ‘Core’. Then under that table, find what is defined as the ‘memory_limit’. It probably reads 64M for 64 Megabytes. We will come back to this page later to verify our updates have taken place.
![]() Now, check to see if APC is enabled — it should be based on the default settings that GoDaddy is providing. Find the section labeled ‘apc’ — it should be near the top of the page because the configuration profiles are displayed in alphabetical order. Find the ‘shm_size’ definition. It should read 32M for 32 Megabytes.
Now, check to see if APC is enabled — it should be based on the default settings that GoDaddy is providing. Find the section labeled ‘apc’ — it should be near the top of the page because the configuration profiles are displayed in alphabetical order. Find the ‘shm_size’ definition. It should read 32M for 32 Megabytes.
OK, now we’re ready to update these settings. Go back to the File Manager and check to see if there is a file in your web root named ‘php.ini’. If not, create it. Then edit it and put in these settings:
memory_limit = 128M;
;APC
extension=”apc.so”
apc.enabled=1
apc.shm_segments=1
apc.shm_size=128
apc.ttl=7200
apc.user_ttl=7200
apc.num_files_hint=1024
apc.enable_cli=1
apc.stat=1
The main point of this block is to increase the shm_size to 128 megabytes. It accomplishes some other things as well, but those are a good solid base to go off of. I noticed when I created my php.ini file with just the PHP memory_limit update, it disabled APC for some reason. The lines at the top of the APC configuration make sure it is enabled. Save the file.
Now, in order to get your environment to read the php.ini file you just created, we will need to reset PHP. In cPanel, find PHP Processes under Software. Hit the ‘Kill Processes’ button and let it load. Then go back and refresh your phpinfo.php file you created. Go through and make sure that your memory_limit is now 128M and that APC is enabled and shm_size is 128M as well. If you see those updates, then you have successfully updated your PHP and APC memory size!
ALERT! Be sure to delete the phpinfo.php file you created. You don’t want that file hanging around and accessible to read as it gives clues to your system and is a security hole.
3. Configure W3 Total Cache
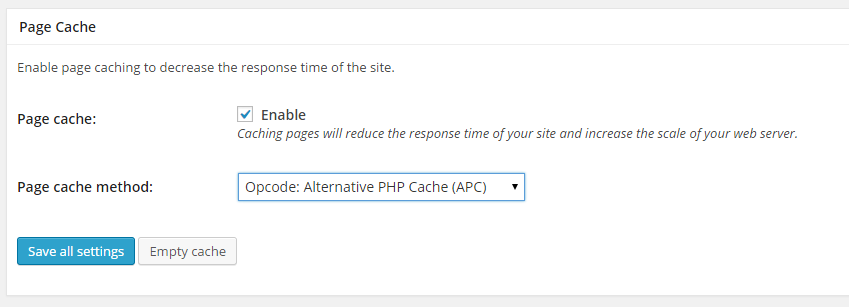
Now that we have the PHP memory and APC upgraded and enabled, we will want to configure W3 Total Cache to utilize APC. Login to your WP admin and go to the Performance settings and the General tab. For all of the sections of caching that you want to use, be sure to select ‘Opcode: Alternative PHP Cache (APC)’ from the dropdown as the method.

We recommend utilizing all of the out-of-the-box caching methods (Page, Minify, Database, Object, Browser) with Page, Minify, and Browser caching being the most important.

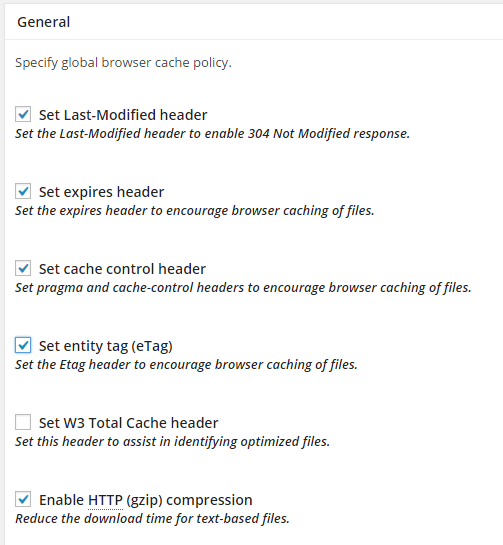
Now, we’ll focus on Browser and Minify specific settings and recommendations. Drill in to the Browser tab using the sub-navigation underneath Performance in the sidebar. Be sure all these settings are enabled. These are the most important for telling a user’s browser that it can cache static files like images, css, and javascript for a really long time so their browser uses a cached version of files on their local machine when they browse additional pages and revisit the site.
For Minify, there are multiple approaches based on how well W3TC is able to minify your CSS and JS using the ‘auto’ method. In most cases, you can’t foul up your site by minifying and combining CSS. However, you definitely can when you try and combine javascript. Be sure to test your site carefully when making updates to the minify configurations. Get used to viewing the source code on your page. If this is past your expertise level, just set it to ‘auto’, test and make sure things are working well, and call it a day.
If you want more detailed explanations or instructions on how to get more out of your configurations, contact us today.
